The Australian dollar is holding steady near 0.6510, buoyed by a surprise rate hold from the Reserve Bank of Australia and a deepening US dollar slump. In a 6–3 split decision, the RBA kept rates at 3.85% in July, temporarily boosting AUD by nearly 0.8%. However, a spike in unemployment to 4.3% and softening consumer data have markets bracing for a potential cut in August.
Meanwhile, the RBNZ's dovish tilt—after its sixth straight rate hold—has added downside pressure to the Kiwi, further amplifying the AUDNZD divergence. Across the Pacific, the greenback is grappling with structural weakness, losing over 13% year-to-date amid ballooning fiscal concerns and trade-policy risks tied to tariff escalations.
1. RBA Pause & RBNZ Weakness
Australia's central bank surprised markets by holding rates at 3.85% in July (6–3 vote), sparking ~0.8% AUD rally but reinforcing caution ahead of the likely August cut. June unemployment jumped to 4.3%, nudging markets closer to an August rate reduction.
2. Dollar Sentiment & Trade Risks
The US dollar continues its historic decline (~–13% YTD), pressured by rising debt concerns and tariff uncertainty. This structural USD weakness supports AUD positions, though spikes in global trade tensions could temporarily weigh.
3. Technical Outlook
AUDUSD is trading near 0.6510, sandwiched between the 50‑day EMA (~0.6475) and 200‑day EMA (~0.6550). A breakout above 0.6550 may target 0.6600, while a slip below 0.6470 could test 0.6400.
Summary
The Aussie sits in a wait-and-see mode, cushioned by central bank caution and USD softness. Please stay alert to upcoming RBA guidance, US CPI prints, and flare-ups in global trade rhetoric.
AUDUSD – H4 Timeframe
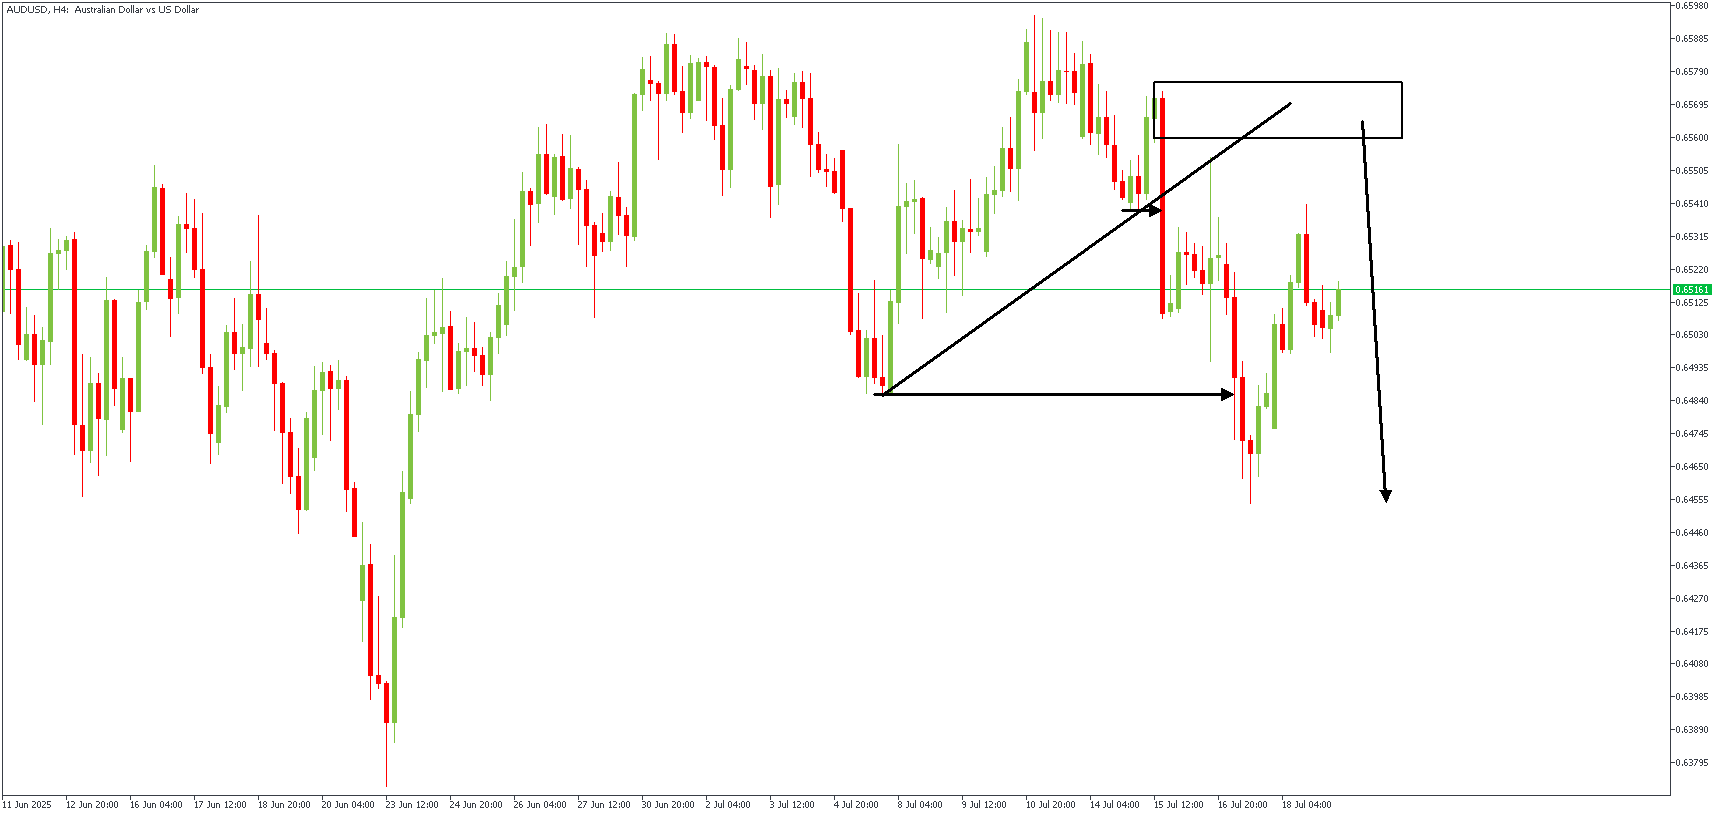
On this AUDUSD 4-hour chart:
- Price broke down from a rising channel, breaking structure and shifting momentum to the downside.
- After a sharp selloff, price is now in a retracement phase, climbing back toward the origin of the bearish move.
- It's currently testing a bearish supply zone (highlighted box) around 0.6555–0.6580, which aligns with the previous support-turned-resistance.
This zone was responsible for the most recent break of structure (BOS), making it a likely area for sellers to re-enter.
My Trading Plan:
I'll wait for price to react to this supply zone (0.6555–0.6580).
- If bearish price action forms there (like a bearish engulfing or long upper wick), I'll look to go short, targeting a move back toward the 0.6450 area.
- If price pushes and closes above the supply zone (above 0.6585), I'll stay out and reassess.
This setup relies on the bearish structure shift remaining intact and supply holding firm. The clean BOS + retest = high-probability short zone.
Direction: Bearish
Target- 0.64549
Invalidation- 0.65912
CONCLUSION
You can access more trade ideas and prompt market updates on the Telegram channel.